Monday, 10 June 2019

summer sewing: a jade green maxi dress

I got it done on time!


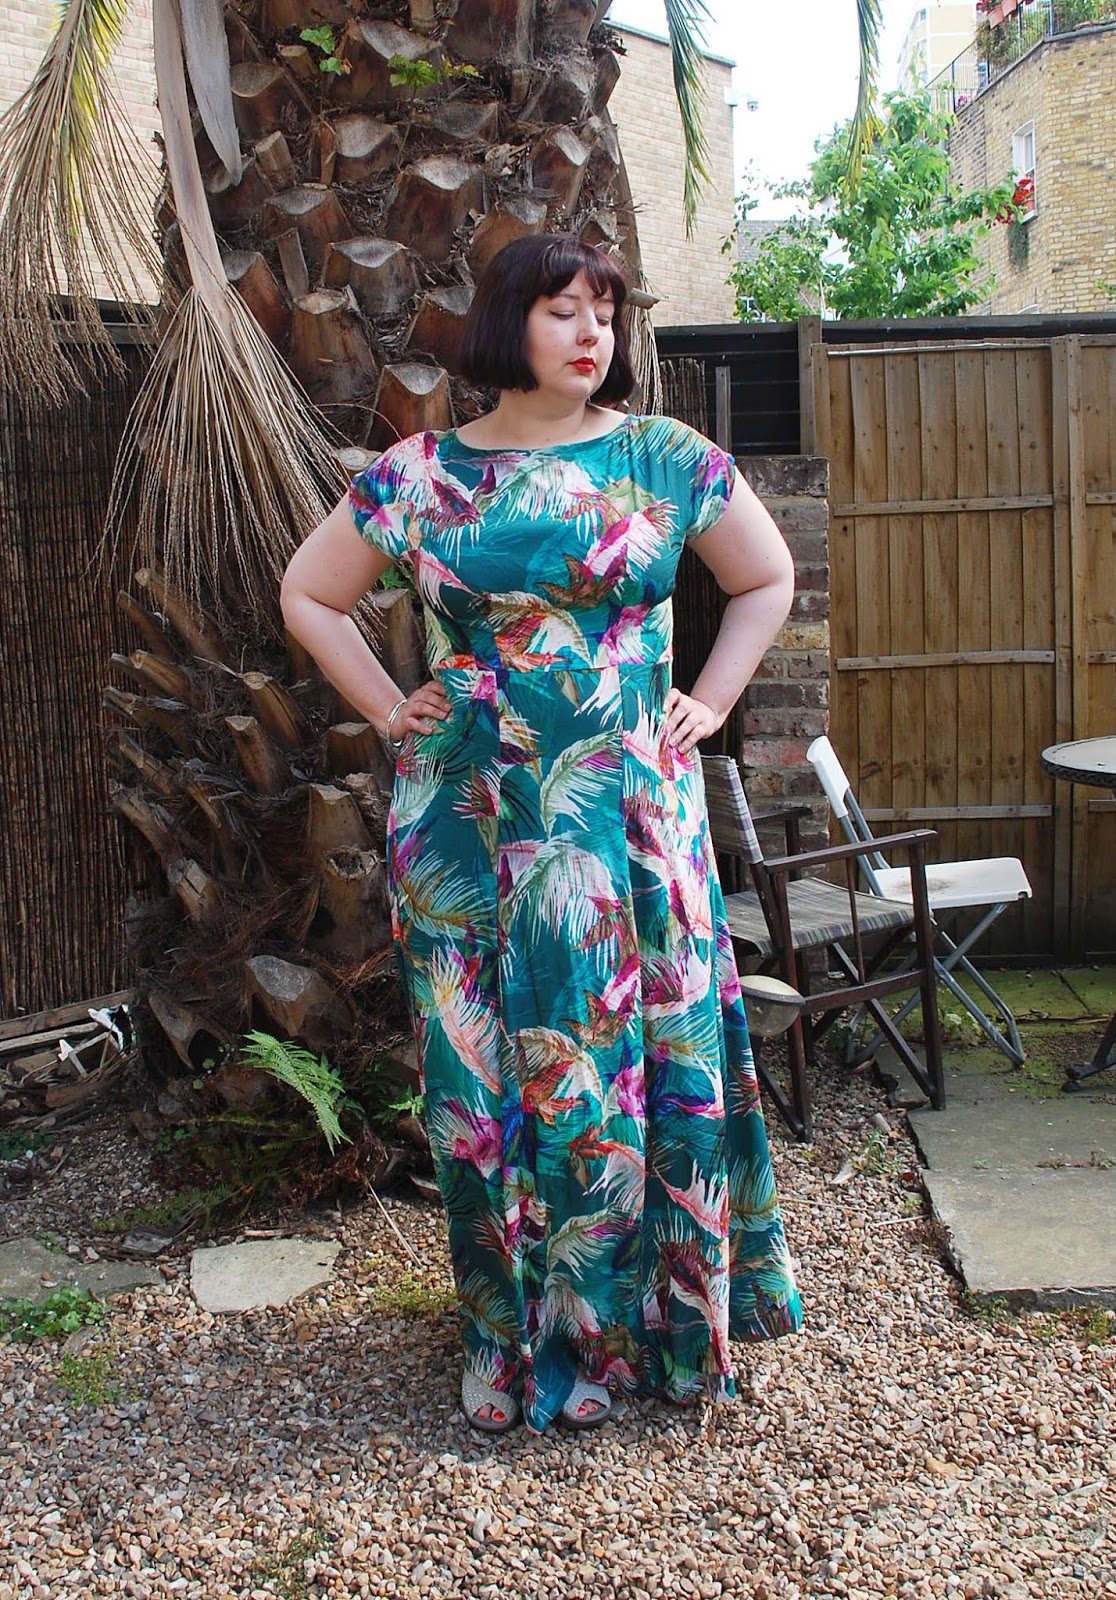
I haven't made a BHL Anna dress since late 2017, when I made several of them in quick succession the decided that I'd reached saturation point and really needed to find a new go-to woven bodice. What happened instead, as you may have noticed, is that I've barely made a woven dress since. It just feels like too much work. I've made a few attempts in the past to fit a princess seam bodice properly and it's REALLY annoying. Trying to get the neckline to lie properly, the waist to hit where the waist is supposed to hit, and most awkward of all the fabric to sit in properly under the bust instead of creating a weird slope from the apex to the waist was super frustrating and I just gave up. Maybe I'll try again soon.

With the Anna, however, you just make a couple of pleats and you're good to go.


When I bought this fabric - viscose crepe, beautiful texture, swishy rather than floaty if you want to get technical - I'd intended on trying a new strappy maxi dress pattern with it. I saw a pattern in Sew Today that looked like just the thing, but they didn't provide a photo of the back and when I went to buy it, I discovered it wasn't remotely bra-friendly. I had a look for something else I liked, came up short. Everything was either not suitable for wearing with a bra or was button-front, which I just don't like. I was going to hold on to the fabric to see what else would be released in the summer before I realised I had to attend a wedding on the 7th and didn't have anything to wear. I'd known about the wedding for a while but hadn't got clarity on the dress code (i.e. whether visible lower leg was acceptable for the temple or not), and by the time I realised the bride was going to be way too rushed off her feet and stressed to answer my nitpicky questions I barely had a week left to make the dress.


I played it safe and made the full-length version, and I'm glad I did. I'm still not exactly sure what the temple rules are; there was a woman there in a shorter dress and they didn't kick her out or anything, but everybody else was covered to the ankles, so I felt much more comfortable in a maxi (even though it was raining all day and I had to be on full puddle avoidance alert). I omitted the front slit for obvious reasons. At first I thought I might unpick it later to put the slit in after the wedding, but after wearing it for both days of the wedding I think I'll keep it like this. It's slightly less fancy-glam with no slit, and while I'm a big fan of fancy-glam it's not always the most versatile thing.


This is a size bigger than I usually make because stress-eating has consequences. I'm trying to work on that now (in conjunction with my therapist, no diets, slow progress, all the good stuff) but in the meantime I do need a little bit more room. The fabric also has a very slight stretch to it, meaning that the dress is super mega comfortable and I would be quite happy to wear it for eating giant meals. In fact, that's likely to be its main use over the summer. Other than that it's my standard altered Anna with a 2.5in FBA and no neckline facing. I have never used the included facing on any of my Annas after hating it so much on my original trial bodice, but I use a different alternative finishing method almost every time. For this one I used bias binding and topstitched it down to the inside.


Here's a photo we took outside the wedding venue. I wore a pashmina to cover my upper arms (I didn't make it, I bought it in Spain at least fifteen years ago) and I borrowed a pink and green headscarf when we got inside. The two-scarves thing was a bit unwieldy and I would have been better off with a shrug or jacket or similar, but I don't have anything that a) is formal enough, b) can be reasonably worn indoors, and c) doesn't look like ass with a full-length dress. I definitely didn't have enough time to conceive, buy supplies for and make such a garment, so unwieldy double-scarf action it was. For the reception the following evening I just stuck one of my Lupin jackets over the top to get me to the venue then wore it as is. Much curry was eaten. Many open bar cocktails were had. Much dancing was done to Uptown Funk, which seems to have finally dethroned Billie Jean as the opening wedding disco song of choice, and joyous techno-bhangra. Despite the dress being full length and me being drunk, I had zero issue dancing in it. Bonus!


I'm very pleased with this and I think it'll work just as well for standard summer days as for fancier occasions. I really like it with my denim Lupin. I'm particularly looking forward to wearing it during our holiday to San Sebastian next month, where we will just be eating constantly, as far as I can tell (it's my father-in-law's birthday and he's been planning this trip for at least a decade) and it's always good to look fancy as you fill your face with seafood. I won't make another Anna for a while but it's really nice to revisit an old favourite every now and then. 

Next up: either leggings or summer robe, depending on how photography goes this week!

 By Hand London Anna dress

Fabric: Viscose crepe from Walthamstow
Cost: £9
Pattern details: (as if you need these) Kimono sleeve dress with boat or V neck variations, underbust pleats, seven-panel skirt with maxi or knee-length variations
Size: UK 18
Alterations: 2.5 inch FBA, facing swapped out for bias facing
Would make again/would recommend: Yes/Yes

Monday, 3 June 2019

sewing plans: summer 2019

My spring plan was much less successful than I might have hoped. Part of that was the dip in my mental health that stopped me sewing for more than a month, but also most of the things I made just didn't work. I only really liked the denim skirt and the Nettie; everything else was on a sliding scale of fail from "I suppose I don't hate it but it's not really what I want" to "get this demon thing away from me immediately" (let's just say you will not be seeing any Sara trousers on this blog any time soon). I didn't get to everything; I still intend to make the bag set once I find all the hardware, and the shirt is all cut out and interfaced but I'm too chicken to start sewing it. I will do it. I will. Who's determined to do the scary thing?


Generally I find my summer plans much easier because summer clothes are what I'm most comfortable in. For the most part I've figured out what works for me and if I wasn't allowed to sew anything all summer I'd mostly be completely fine. There are a couple of actual wardrobe gaps, which I will fill, but mostly my plan is focused around two things: the practical sewing that I keep putting off because it seems hard/scary/annoying; and using up fabric from my stash. I've changed my approach to fabric this year, making a point of tracking my purchases and keeping a record of how much I have vs how much I've used, and it's made me realise how freaked out I get when I have too much stuff in. I know this isn't a common problem, but I don't have much space to hoard fabric, and when it starts to build up it generally means I'm panic buying because I'm not inspired to sew. I've now set myself a maximum number of metres I can keep at any one time, and I'd like to take it a fair bit below that this summer so that I'm not playing fabric chicken when I'm stressed. While I will need to buy a few things for this plan, I want to keep my shopping quite restrained for the next few months and work through some of the pieces I already have.

With that in mind, here's what I'm thinking:

Wardrobe gaps

Multiple pairs of summer trousers

The one thing I really noticed during this year's Me Made May is that I only have one pair of trousers I can wear this time of year (I broke out winter trousers twice and I really didn't like it). Over the past year or so I've become much more inclined to wear trousers again, having abandoned them almost entirely when I started sewing, but I've struggled to get them right. What I think I want is two pairs of slightly more structured trousers to get me through the days when we don't have any weather at all, and one super-light pair for when it's actually hot, though I might bump that up to two if we have a really hot summer again. I definitely want to have a second go at the Victory Patterns Esther trousers; I ended up really liking my first pair apart from the bit where they looked like pyjamas with every single top I own besides the one I wore in the photos. Gah. I went out to get fabric, spent some time deliberating between light navy and neutral stone, came away with bright emerald green because I'm an idiot.

For the super-light trousers I'm thinking of trying the Rae pants from Breaking the Pattern. I wasn't sure about these at first because of the leg slits, but now I think they might be fun and I can either put more effort into remembering to de-hair my legs or I can not.

A pair of shorts

During the summer I tend to be most comfortable in maxi dresses or full-length jumpsuits; I do have a couple of shorter dresses but they don't get that much wear. I'm not sure how much of this is due to chafing issues and how much is due to my aforementioned lack of interest in dealing with leg hair, so I'd like to experiment and try out a pair of shorts. It'll probably be either the Thurlows or M7726 (or both), probably lengthened a bit because my thighs can and will still rub below the hemlines of most short shorts.


Activewear and underthings

Some anti-chafing shorts

This is the thing I need the most and also the thing I least want to make. I have been trying for years to not make anti-chafing shorts, but sadly I think the time has come. Many years ago I found my ideal pair in Sainsbury's - I think they're meant to be shapewear but the compression is very light, meaning that it's not especially restrictive but also they don't ride up my legs (or down my torso). I have worn these to death and soon I won't be able to lie to myself about how much they're falling apart anymore. I have looked for something similar every single time I've gone anywhere near an underwear section and I haven't found them. I've bought several different pairs of actual anti-chafing shorts and they just don't work. Either they're too short (apparently my bit-that-chafes covers a lot more area than most) or they ride up within minutes and sit unhelpfully in my crotch. I'm going to start off trying a shorts version of the Jalie Clara leggings,which I really like (review incoming soon), but I do not know where I'm going to find the right fabric. Basically all my hopes are resting on my trip to Abakhan in a few weeks.

Some leggings

I also want to use the Jalie Clara for more actual leggings this summer. I absolutely need at least one black pair and again I'm worried about finding a fabric that will work (fingers crossed for the Abakhan activewear bin), but one thing I can definitely get on with is cutting into the absolutely ridiculous galaxy print spandex I bought for precisely this occasion. I'm hoping to have enough left over for a matching crop top so that I can achieve maximum ridiculousness.

A bikini

I tried making a bikini once before, and honestly both the pattern and the fabric were terrible. I had to throw it away when I got back from holiday. I've been wanting to try another one ever since but it's been completely impossible to find a pattern I like. I don't know if this is just me (it may well be), but I get really excited every time a company announces a new swimwear release and every time I'm disappointed at how ugly it is. Why so many monoboob crop tops? Why so many GIANT bikini bottoms? I say this as someone who will never be persuaded into low rise anything and likes to feel nicely enclosed: bikini bottoms that pull up over the belly button are really tough to balance proportionally and nobody is doing it right. Finally I came across the Jalie Gigi bikini, where the bottoms sit nicely just below the belly button like I wanted. I have some grey and pink fabric that I really like, but I'll probably need to work out how to put a bit more support into the top.


What's in the stash

A red linen jumpsuit


I bought this piece of raspberry linen on my trip to New York a year ago. I don't want to hold onto it any longer because I don't want it to become too precious to cut, and also I'd quite like to actually wear it. I think it's going to be a Paper Theory Zadie jumpsuit, but I still haven't worked out what to do about the length. I might dig out some toile fabric and see if I like the way it looks as a playsuit, or see if I can eke out more length by making the binding/inside pocket etc out of a different fabric.

A floral wrap skirt


This twill viscose I talked about in my Walthamstow post is going to become a wrap skirt this summer. I'm thinking of trying M7813 (haven't decided which view yet) or possibly the Vanessa Pouzet Boheme if I can be bothered to grade up the hips. I also want to make a short-sleeved navy bodysuit to go with it.

Some ridiculous bronze thing


It's utterly stupid that I'm still sitting terrified on this £9 piece of viscose, and I'm definitely going to use it in the next couple of months. When I talked about it in my Walthamstow post I said I was worried it would be overwhelming head to toe, and frankly I'm starting to think that my best option is just to lean into it. The idea of a matching two-piece has popped into my head, but whether that becomes a reality mostly depends on whether I can find a summer top pattern for wovens that isn't a) super loose or b) button back. Button back tops look lovely on other people, but they're too much faff for me to put on and I can't be arsed. There's also the possibility that it'll become a maxi dress, or the aforementioned Rae trousers.

A palm print maxi dress


I couldn't take a proper photo of this fabric as I've cut it out already - I'm going to a wedding this Friday and I need something to wear. I do have a couple of standby "one of Patrick's friends is getting married" dresses, but this one is in a Sikh temple and I'm not quite sure what the rules are about knees, so I'm just going to make a full-length Anna dress with no slit and side-step that whole thing entirely. I think the dress is going to be great and I'm very excited about it.

This needs to be something


I'd love some suggestions on what to do with this. It's two layers of cotton sandwiched together, is completely reversible, and is also apparently Karen Millen fabric (though I've not been able to find any photos of it in use). I don't use a lot of cotton and because it's double layered it's thicker and more structured than I'm used to, so I'm not really sure what its best use would be. I really want to take advantage of using both sides of the fabric; possibly a mostly black jumpsuit with one white crossover piece or waistband? Two piece where the top is one colour and the bottom is another? Panelled dress?  I have about three and a half metres (I asked for three but he definitely gave me extra) and I feel like I ought to be able to get a really awesome statement outfit out of it. Please let me know what you think!

For the most part, I think this is a fairly easy plan. It doesn't require me to buy too much fabric (or many patterns or notions, for that matter) and should be convenient enough for me to just get on with. Fingers crossed for my motivation and a successful trip to Abakhan!

Monday, 27 May 2019

spring sewing: a bright purple coat, and bonus Ruska

I was completely certain that I was back on track with my normal schedule, but this post took me much longer to write (and photograph) than I'd thought it would. When I first finished this coat I was completely thrilled with it, but now that a couple of weeks have passed, I'm feeling much less enthused.


I'll start off by saying that I know this looks cute. It's a nice shape, a great colour, and aside from being a little wrinkly it photographs well. People are always keen to reassure that an item is totally wearable and I appreciate it, but a lot of the issues I have with this coat are things that aren't really apparent from pictures. 


A few weeks after I made my spring plan I happened to come across this purple wool crepe at my favourite stall in Walthamstow and got really excited. I thought it was a great weight for a light coat and a perfect colour for me for spring. I also chanced upon Simplicity 8554, an unlined coat pattern designed for lighter fabrics in a wrap style with a proper collar. The pattern arriving through my letterbox was the final push I needed to actually start sewing again after a very unpleasant month. I'm therefore reluctant to be too hard on this coat because it did get me my sewjo back, but in retrospect, these two elements are both nice individually but don't go terribly well together.


The more I wear (or attempt to wear) this coat, the more I'm aware that I whiffed the fabric choice. This stuff is slightly too thick and slightly lacking in the right drape for the garment to fall nicely. It also led to a bunch of issues with the seams, but we'll get on to that in a minute. On top of that, it's not quite soft enough to work as an unlined coat generally intended to be worn over short sleeves in the spring. It's not super itchy or anything, but it's just that tiny bit irritating, enough to put me off wearing it.


The other problem with this fabric is the colour. It's a great colour, and I really did want a brighter coat for spring, but it literally doesn't go with anything. The reason this took me so long to post is that I took at least four runs at photographing this coat with different outfits, trying to find something that looked OK, and kept coming up short. It doesn't help that I have a bit of a thing against wearing a rainbow colour on the top and black on the bottom (I could not tell you why, I just never like the way it looks on me), which I probably should have considered before I cut this out. This is the closest I get to liking it - leaning in to the contrast and wearing it with full-on bright mustard yellow. I think this looks good, but I really don't want to have to co-ordinate my outfit around my coats.


This would be an incredibly quick and easy sew (by coat standards), except for one thing: it's unlined, so there is a crapton of seam finishing to do, and for some reason the pattern instructions don't mention this at all. They tell you to finish the raw edge of the facing and that's it. I muddled my way through most of the finishing - I used bias binding on all the seams (Hong Kong finish on the main seams and normal binding on the pockets and armholes) because I wanted it to look nice, but really had no idea which order to do things in to get the best end result. Honestly, it's not worked all that well. The fabric, as I mentioned, is slightly too thick for the style of the coat and as a result it all feels a bit bulky and unwieldy. I wanted to use a Liberty bias binding for cool floral insides, but then that would have cost about £40 and I didn't want it THAT much. I used a not-quite-matching purple for most of the seams, and a grey for the sleeve seams because I ran out and the sleeves seemed like the least conspicuous place.


This coat also has in-seam pockets, and I'll be honest, I just hate them. They're awkward, they're not comfortable for me to put things in, and they bulge when I cinch the waist in. I knew I was going to hate them before I even started, but I didn't know what I could switch them out for in an unlined coat and a coat with no pockets is just stupid. I don't desperately need everything to have pockets if it doesn't work for the pattern, but I bought a pocket-free coat once ages ago, and it drove me absolutely nuts. Where else can I awkwardly shove my hands?? On second thought, don't answer that.


Beyond the seams I made very few adjustments other than to shorten the pattern to knee length (partly because that was my original intention, partly because at mid-calf length this thing gives off a slight air of bathrobe). I was intending to just sew up the side seams rather than having the splits, but aforementioned lack of bias binding forced my hand and in retrospect I'm glad. This is a super-simple coat and it's nice to have that little detail there.


I still really like the style of this coat and if I could find my way around the bits I didn't like, I would definitely make it again. I would definitely want to switch out the pocket, so if anyone could recommend an alternative pocket type that won't look like ass in an unlined coat, please let me know! I would also want a lighter, drapier fabric that would allow me to just French seam the whole coat, skipping all the stupid bulky seaming bits, and a slightly more workable colour. I'll be on the lookout.


While we're here, here's a proper look at the dress, which I don't think requires its own post as I've covered the Ruska dress pretty thoroughly:


This wasn't at all what I intended to make (I wanted a waist seam and a slightly roomier skirt) but I used most of the fabric trying out Vogue 9023, which I hated. I should have dealt with it long enough to take a picture, but it's one of the most unflattering things I've ever seen on me. Part of that is just personal preference, but a chunk of the credit also has to go to the sleeves, which were HUGE. I have never seen sleeve caps that big. They were so much higher and wider than my usual well-fitting jersey sleeves that I was able to literally cut them off the dress (leaving a decent amount of fabric behind in the seam allowance), lay the Ruska sleeve over the top and comfortably cut new ones. Which in a way is good, because I wouldn't have had enough fabric for a second full dress otherwise. This isn't my ideal dress, but it is good enough to be wearable, and I don't have to be sad that I wasted this SUPER soft ponte. It's from Fabric Land and it's lovely.


My summer sewing plans will be up next. Spring didn't go well for me at all (in terms of ability to actually sew and success rate of the finished pieces), so I'm excited to move away from it and start thinking about a fresh set of projects, hopefully with overall better results! I am still intending to make the bag set at some point soon, though.

Simplicity 8554 coat

Fabric: Violet wool crepe from Walthamstow Market
Cost: £9
Pattern details: Drapey unlined wrap coat with collar, tie belt and side seam pockets
Size: 18, 20 in the hip
Alterations: Shortened to knee length
Would make again/would recommend: Maybe/Maybe

Monday, 13 May 2019

chill projects: Zadie jumpsuit

I'm back! It's been a pretty unpleasant time, but doing Me Made May these past couple of weeks has invigorated me somewhat and I've been able to make things again. I was intending to come back with a Big Project, but I need a bit more time to write that up, so here's an unplanned palate cleanser instead:


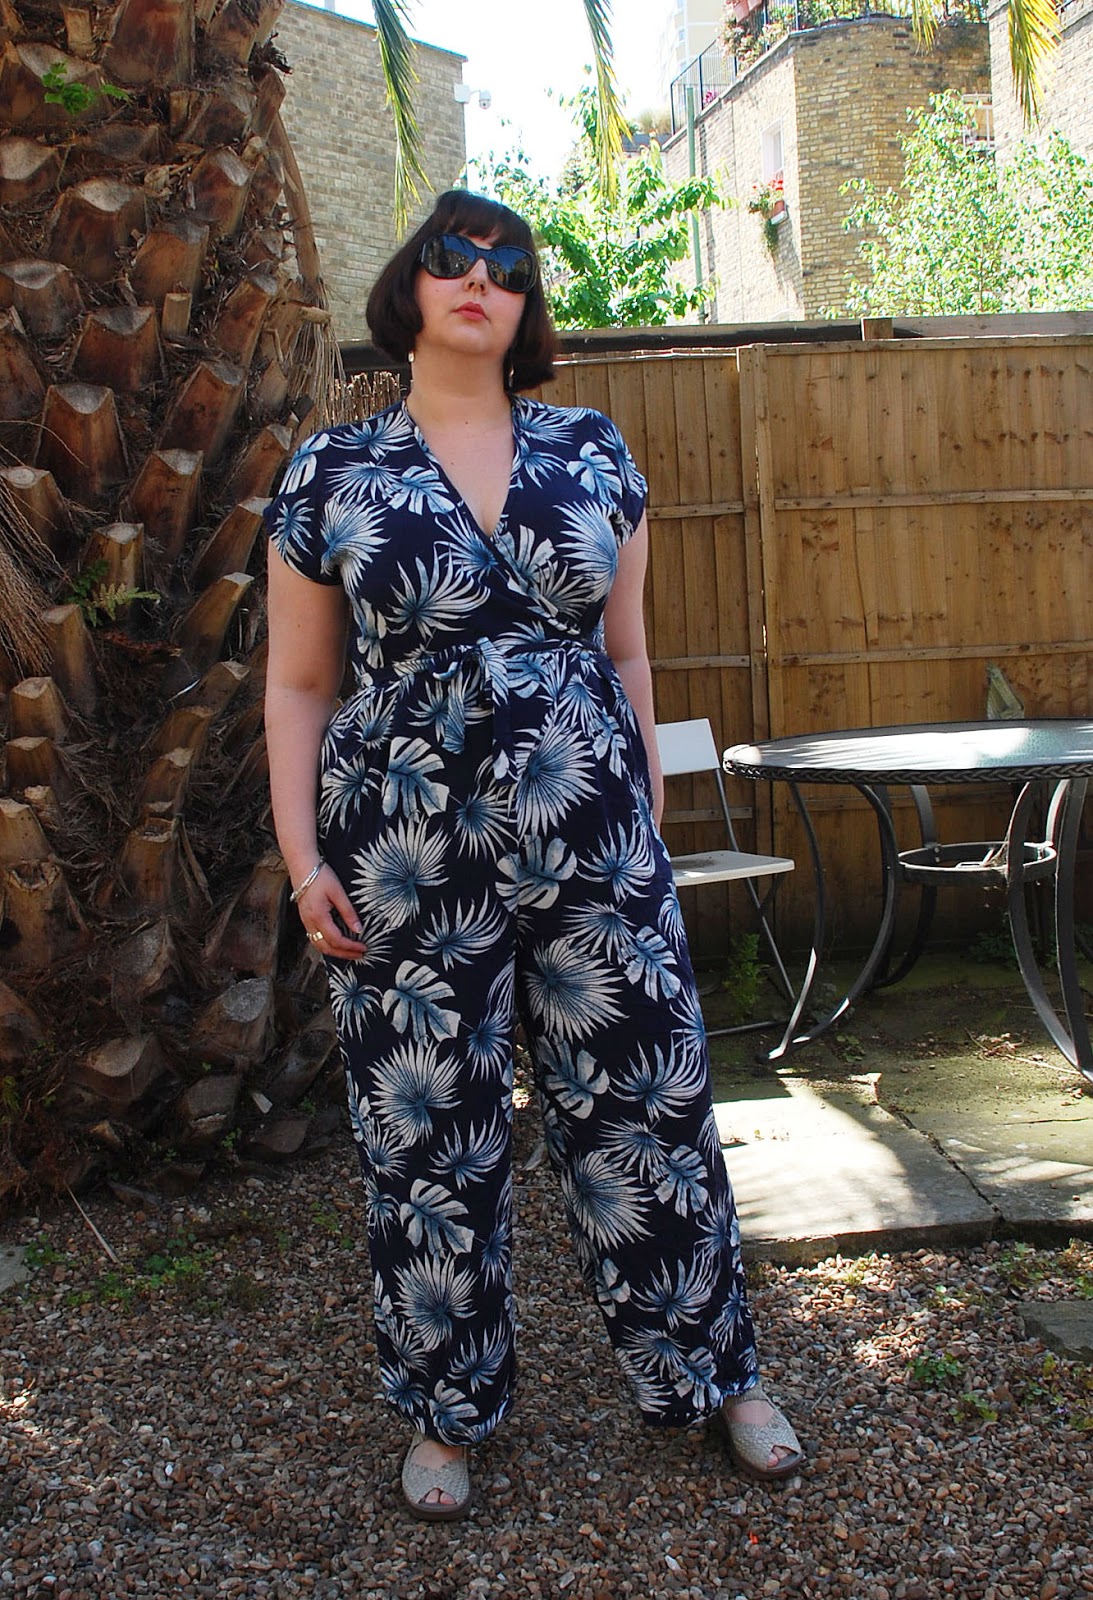
This is the Paper Theory Zadie jumpsuit, which literally everybody has made already and so it doesn't really require a review. But I'm going to do it anyway because this is my blog and I can do what I want.


I actually wasn't that convinced by the sample garments the first time I looked at the pattern. The fit looked - not really bad, but not the way I prefer to wear my clothes. I was quite resolute in not making it until a couple of months ago, when half the people I follow on Instagram suddenly all posted amazing versions and I decided what the hell, I was going to go for it it too. My initial thought was "ooh, maybe this is the pattern for my raspberry red linen from Mood" but I wasn't just going to cut into that for an untested pattern, regardless of how little fitting it claimed to require, so I picked this viscose up from Walthamstow for a trial.


There is a lot of ease in the finished pattern, and bearing in mind my thoughts on the product photos I decided to size down (16 top, 18 hips) for mine. It's still super comfy and has plenty of room, but it's not as oversized as I think is intended. For me, I like this fit a lot better. I took about a centimetre off the length of the bodice as my waist is super short, and that's worked well. The jumpsuit is meant to be cropped but I'm really not sure about that length on me, so I added as much as I could to the legs, which was maybe a couple of inches; the layout is SUPER efficient and there was barely any space at all to add length. While I very much appreciate the lack of fabric wastage, I also hate single layer cutting - we have a very long, thin kitchen floor which allows me exactly the right amount of space to cut fabric on the fold, but for this I was shifting things all over the place and it made it much harder to see how much space I was going to have. That's not a complaint about the pattern, just the reality of choosing to live in London. Sigh. I pieced some cuffs together out of the few scraps remaining at the end so that I didn't have to hem any of the length away. 


Construction was incredibly simple. I French seamed all of the insides apart from the bodice seam with the hole in it and the front crotch seam, since the bias binding starts and ends there. Making the bias binding was the only really fiddly bit of the whole process; if you have a bias tape maker it's probably fine, but since I do not, I used my hair straighteners instead. I do NOT have the dexterity to do pressing that small and precise with a regular iron (I've tried, I burned my fingers), so hair straighteners it is. I picked up that tip from a "what's your bad sewing habit" post full of women going "tee hee sometimes I only turn my jersey hems up ONCE, what a naughty naughty sewist I am" and decided that it was genius. It makes small fiddly bits so much easier to handle and if it's wrong I don't care to hear about it, frankly. 


This is astonishingly comfortable to wear. It's completely non-restrictive but allows me to have a waist at the same time, which is perfect. I will almost certainly make another couple over the summer. I really want to use my Mood linen for one of these, but I'm a little bit worried about fabric requirements as I only have two and a half yards and I'm really not sure about making a cropped leg. I'll experiment a bit with the layout and see what I can come up with! 


 Zadie Jumpsuit

Fabric: Printed viscose from Walthamstow Market
Cost: £7
Pattern details: Wrap-front jumpsuit with cropped legs, big pockets and bias bound neckline made from self fabric
Size: 16 bodice, 18 hips
Alterations: Added length to legs, reduced length of bodice
Would make again/would recommend: Yes/Yes

Up next: I actually made the coat I wasn't sure I'd be able to do! It's purple!

Monday, 15 April 2019

two versions of the Sirocco jumpsuit

Last month Deer and Doe got in touch to ask if I'd be interested in an advance copy of one of their patterns in exchange for a review. I've done this with them once before and it was really interesting for me; I got to try a pattern that I never would have purchased, and though I rarely make the full dress these days I do use bits and pieces of that pattern almost every time I make a knit project. So I was excited to do it again. Then I scrolled down to the photo of the garment they were offering to send and I realised this was a whole other kettle of fish - a pattern I would have fallen out of my chair and purchased within seven seconds of first seeing it. I sat gently bouncing for about forty-five minutes then told them I'd love to.


You know I love a jumpsuit. If you were here in January, you might also be thinking, "My, that looks a lot like a faux-wrap black jumpsuit that could be worn for evening occasions and probably won't have upsetting pocket situations". And yes, I thought that too. It's a knit rather than a woven, but that doesn't remotely bother me. My longtime favourite RTW black jumpsuit was also a knit and I loved it.

While my endgame garment is made of plain black, high quality jersey, I will never just cut straight into expensive fabric for a new pattern. I went to Walthamstow (because of course I did) and bought this soft medium weight jersey with the amount of stretch dictated by the pattern instructions. White paisley outlines are not my usual jam, largely because paisley is so much Patrick's thing that I feel a bit weird wearing it, but the actual substrate was so nice that I decided to deal with it.


The pattern is a faux wrap, pull-on jumpsuit with a waistband panel, set-in sleeves and slash pockets. The bodice and trousers both have front pleats, and the trouser pleats are diagonal to mimic the shape of the pockets, which you can't really see in black printed fabric but is a really nice touch. I cut a 44 in the shoulders, 48 bust, 46 waist, 50 hip and 52 bicep. This is not what I'd cut next time, as I'll detail a bit further down. I also added two inches to the length of the legs, which is fairly standard for me.


First things first: this is a really fabulous jumpsuit and the shape is great. I've never made a narrow-leg jumpsuit before and I was a bit concerned that it would be too body-con without extra fabric in the legs, but it's not a problem at all (full disclosure: it kind of is a problem right now because I've been stress-eating for the last month and I'm pretty bloated, but in these photos from a few weeks ago it's not a problem, so I think I'll be fine once things stop going wrong). I think it would be really easy to make this either casual or fancy depending on fabric or even just styling.

Usually with knit patterns like this there's a piece of elastic at the waist do all the fitting work, but not here; the pattern uses pleats and darts (darts on the back trousers, pleats everywhere else) to give proper shape on both the bodice and trousers going into the waistband. It's great to have a jumpsuit with a sleek "this has been fitted to me personally" effect but also still made of knit so it's super comfortable, doesn't need a zip and glosses over any little bumps. It's unlike anything else I've seen and I think it's awesome. Also worth noting: the pockets are functional, stable, and roomy. Finally!


(SCENE CHANGE, surprise. I thought it made sense to do both so you could get a better view of the top while also being able to see some proper front-on shots.)

For people with similar body shape to me, there are a couple of things to be aware of. First of all, spend a bit of time baste-fitting the bodice and getting the surplice to lie correctly. I don't tend to do this with knit projects as the stretch usually glosses over any fitting issues, but my first attempt at this pattern had the entire middle of my bra visible. I think this is at least in part a result of my cutting too big a bodice. I don't normally add boob room with Deer&Doe, particularly not in knit patterns, and I'm not quite sure why I did this time. I should have just let the stretch do the work and maybe raised the neckline a small amount. I unpicked it to try and cross the wrap over more, but I reached the point where I was just making holes (unpicking black stretch stitches from black fabric, ugh) so I added as much to the crossover as I could and then added a couple of tiny poppers at the bust. Ordinarily I would just sew it closed at the right point, but you can't do that here as the wrap fronts being unconnected to each other is what provides enough room to get in and out of the jumpsuit.


Also on getting in and out of the jumpsuit: there is no zip, and the waist is not elasticated. Additionally, the earlier version of the pattern I was sent called for 30-40% stretch, which has since been corrected to 60% stretch. The first time I tried this jumpsuit on, I definitely heard a few stitches pop. It's entirely possible that I'd still have the same issue with the corrected amount of stretch, since my hips are a few sizes bigger than my waist and the waist is drafted with negative ease, so before I make my third version I'll do some calculations and report back on how the extremely pear-shaped might fare with this! If you're worried, go up a size in the waist - it'll give you an extra couple of inches and still fit with negative ease. I did this with my second version, which you'll see in a moment, and the fit was much the same.


Having produced a garment I really liked but needed some adjustments, I decided that it would be worthwhile to make a second attempt, so that I could test the alterations I thought would be necessary and give a better and more comprehensive review. I'd never made a playsuit before and I thought this was as good a time as any to experiment.
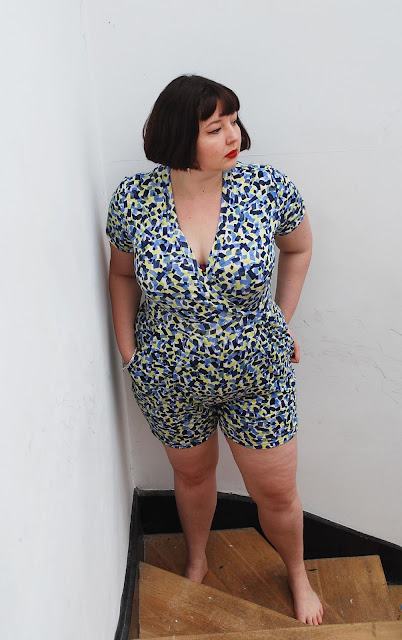

This time I cut a straight 44 bodice, with a little extra room at the upper edge of the wrap and an inch of extra length at the waist edge to give me more leeway overlap the front pieces further. I went up one size to a 48 waist to give a bit more room to stretch over my hips; I was still working to the 40% guideline on this one and so in the future, with a properly stretchy fabric, I might not do this. As I said, I'll do some maths before the next one! I also cut way more length than I thought I'd need on the shorts; I do this basically every time I cut shorts because my fabulous monster fabric-eating thighs are not what people tend to draft for. I marked the cut point on the fabric so that I would be able to see how much I'd added at the end, and it was about 2.5 inches, so that's what I'll be working to in future. I kept everything else the same. Were I to make this playsuit again I would definitely widen the legs - I am not loving this overall effect. I'm not 100% sure if this is another monster-thigh problem or not. The photos on the website show wider legs, which would imply that it is, but previous trouser patterns I've owned that have both a short and full-length version are drafted to be wider at the cut-off point on the shorts than the equivalent point on the trousers, and these aren't. Something to bear in mind!


Attempt two is definitely a much better fit. There is a small amount of bra showing in these photos, but I am standing right at the bottom of the stairs with the camera pointing downwards, so it doesn't normally look like this. However, I really doubt I will be wearing this version. The colours and print of the fabric just aren't me at all, and I don't like how tight the legs are. The fabric also clings way more than in my other version and I'm not a fan. I will almost certainly have another go, however; I really like the idea of this playsuit and I don't think it'll be too hard to adjust it into something I'll love.

Overall, this has been a rousing success for me and I will definitely be making more of both versions. Aside from the plain black jumpsuit of my dreams, I'm also thinking about both a playsuit and a jumpsuit for generally existing in during the summer. I like the idea of electric blue for the playsuit and possibly some kind of leaf print for the jumpsuit, depending on whether I can find a fabric that fits the nebulous idea in my mind. There are definitely a couple of body shape issues at play but they're fairly simple to work around, I think, and having made these two versions I'm pretty confident that I know what I'm doing. I'm thrilled I got to review this pattern and I'm excited to have it in my wardrobe!


Deer and Doe Sirocco jumpsuit

Fabric: Printed jersey from Walthamstow Market
Cost: £5 for the jumpsuit, £4 for the playsuit
Pattern details: Pull-on knit jumpsuit or playsuit with mock wrap neckline, short sleeves, waistband and slash pockets; gifted to me by Deer&Doe in exchange for a review
Size: Graded from 44 bodice to 50 hips
Alterations: Bodice altered to wrap over further in front, legs lengthened by 2in
Would make again/would recommend: Yes/Yes

I can't really tell you what might be up next because I am kind of broken. The last month has been absolutely horrific (multiple family illnesses and horrible diagnoses, the resurgence of some old and very unwelcome trauma, and also our bathroom literally flooding with sewage) and my motivation to sew has been almost non-existent. I'm hopeful that when the bedroom ceiling repair is finally finished and we can have our flat to ourselves again I can go through my stash and find a bit of excitement to make something, but my mental health is precarious right now and I don't know how it's going to shake out. Fingers crossed that things will stabilise and I'll be back with something next week!

Monday, 1 April 2019

spring sewing: Ellis skirt (and bonus Nettie)

As I've mentioned a couple of times now, I keep making denim skirts and they keep sucking. Most of them are so terrible they don't make it to being photographed. I've put my Ness skirt back on a few times since making it, and concluded every time that it's really not wearable and the fit around my waist and hips is just too weird. I had been planning to have another go at it, but put that idea to the side when I realised I'd be making eleven different adjustments for an outcome that was by no means guaranteed. I also briefly considered making a standard mini skirt out of denim and dramatically reshaping the back to be more of a tulip, but eventually went for the Cashmerette Ellis. I said in my sewing plans that I was a bit sceptical about the apple/pear differential, but went ahead and purchased it on two grounds: one, I wasn't sure I could take any more failures and Cashmerette has always fit me fairly reliably; and two, the line art showed the skirt noticeably tapering in towards the hem, which seemed like it would go some way to curing my butt-cape issue.


And look! It's wearable! That sounds like damning with faint praise, but every other denim skirt I have made has been worn out of the house once and then thrown away when I get back. There are certainly a couple of adjustments that I could make to this pattern, but they're quite minor and, crucially, won't stop me wearing this version as part of my normal wardrobe.


I normally make a size 12 waist in Cashmerette, but went for a 14 this time. My smallest part is very high on my waist, higher up than I would normally wear a skirt, so I thought it'd be safer to size up. For future versions (which I will make) I would size down in the back but not the front as I have a tiny bit of gaping at my back waist. I cut between 16 and 18 in the hips, and that was too big (you can see it's giving me wrinkles). Next time I'll go to 16 or a bit smaller. I bought 2m of this denim and the skirt uses 1m of it, so I'm going to make a second version with the fit adjustments I've detailed here and report back on how it works.

I also shortened the skirt by about an inch and a half, which is pretty standard for me; I think I'm an inch or two taller than the height Cashmerette drafts for but I tend to prefer my mini skirts to be a little shorter.


This skirt does not give me butt-cape (finally!) but I would prefer it to taper in slightly more. On future versions I'll either taper the back panels in more, or just size down and do a full butt adjustment. I've never done one before but I probably ought to start. Also next time I will use a slightly shorter zip. The pattern calls for a 7" zip but I had a good inch or so of my zip hanging outside the fly extension. I would probably use a 6" in the future, as that's what the fly extension measures.


You will notice that I did not do the contrast topstitching. I did some of the topstitching in navy, but I am not precise enough for nice-looking topstitching and the denim was super bulky (I thought I'd bought the same stuff I used for my last attempt, but this was both darker and bulkier) so it definitely wasn't the best time to start. It's on my list of things to practice, though, and I will make a topstitched version at some point. Almost all of my seams are flat-felled (the pocket lining is French seamed); the pattern calls for a zig-zag stitch or overlocking to finish, but I'm really not interested in a denim garment that's not flat-felled.


I'm wearing it with the Closet Case Patterns Nettie bodysuit from my spring plans. Normally I make a separate post for all my planned garments even if they're repeats, but I genuinely can't think of anything else I could possibly say about this. I wasn't convinced about this fabric as it isn't what I thought it was going to be when I ordered it, but I actually don't hate the way this looks on me and I've worn it a fair bit over the few weeks since I made it.


In conclusion: yes, something has FINALLY worked. I will definitely make more of these, probably in some form of needlecord. I saw a really pretty gold printed one last week that I've been struggling not to buy ever since, but I really need to clear another 20 metres or so out of my stash before I buy anything else. Ugh, the trials of living in London and having zero space to put anything. Our ceiling repair is finally getting finished this week and I'm going to attempt to use all the moving stuff around as an opportunity to KonMari my living space a bit. Possibly my sewing patterns also. I've definitely got at least a dozen that need to go but I never get round to it because we don't have any charity shops (or shops in general) anywhere within easy walking distance. I need to get a grip, though, because I'm not going to stop buying shiny new patterns any time soon! 


Ellis skirt

Fabric: Indigo stretch denim from Walthamstow Market
Cost: £10
Pattern details: Straight/slightly tapered skirt with two views: classic jean skirt with topstitching and front slit, and simpler mini skirt with diagonal pockets
Size: 14 waist, between 16-18 hip
Alterations: Hem shortened slightly, contrast topstitching omitted
Would make again/would recommend: Yes/Yes