Thursday, 1 August 2019

summer sewing: an ambivalent review of the Amy jumpsuit

I'm back! We had a really great holiday (Biarritz is WAY too expensive to stay in but the food is fantastic, and San Sebastian is just beautiful and lovely and chilled and everyone should go if they have the opportunity) and I have eaten so. much. fish. I love going on holidays to seafood places. We also had two horribly expensive meals, courtesy of Patrick's father who has been saving for this for about twenty years, one of which was the biggest wankers' paradise I have ever been to in my life. They started off by giving us a dictionary of culinary witticisms, and at one point served me a very small piece of green pepper with three (THREE) glasses of wine. I felt quite sick by the time we left. 

With that out of the way, here's what happened to my bronze viscose:


This is the Closet Case Patterns Amy jumpsuit, and I've been putting off writing up my review because I genuinely can't decide what I think of it. Please bear with me as I attempt to work through my various thought processes.

First of all, I will say that my worries about this colour and print being overwhelming were completely unfounded. Somehow on the body the print is much less in your face and the colour seems to lean much more in the bronze/mustard direction than HI LOOK AT ME I AM EXTREMELY YELLOW AND ALSO EXTREMELY PRINTED. I really like it. 


The Amy pattern is intended to give the impression of a simple summer dress while actually being a super-wide leg jumpsuit, and that was a good part of the reason I decided to make it. I wear jumpsuits all the time in the summer because they protect against chafing while allowing me to keep relatively cool, and I liked the idea of a faux dress that didn't require an extra layer of shorts. It's incredibly comfortable and non-restrictive, and I think if we were having a summer like last year's I'd be wearing this a whole lot more. 


I think I have two main qualms with this pattern, the first being simply that I'm not sure the style is right for me. I think I'd like it better if I'd had enough fabric to fully lengthen it. Midi length skirts and cropped trousers are things I almost always steer clear of, and though I will ignore my personal fashion rules occasionally if the overall idea appeals to me, I think this looks a bit odd. Also it means I have to take into account how hairy my ankles are, and I will never like any garment enough to commit to a strict depilatory routine. 

The overall shape is another thing I'm not quite sure about. I thought the belt would be enough to do the shaping work, but even with that I don't think it's quite right. Possibly the faux dress/culottes thing works against it here, as belting a dress isn't going to disrupt any crotch seams. As you can see, I'm not a fan at all of the jumpsuit without a belt and I would never wear it that way. Some people can pull off the tent look, I am not one of them. 


In regards to the actual pattern, there were a couple of things I really didn't like. The first, and more minor, point is that this pattern comes with a belt but not belt loops. This is a very specific pet peeve of mine - I am a naturally very scruffy and easily dishevelled person, and sashes become very quietly unknotted on me all the time. If it's not attached to the garment by other means, I WILL lose it on the Tube and not notice until three hours later. This has happened to me more than once. It may be that this doesn't really bother other people, but it really annoys me. I can deal with it on something like the Esther trousers, where belt loops would really change the look of the garment and the sash fabric isn't slippery at all and won't snake itself loose at the least opportunity, but not here. Belt loops, please. 


Point two is the side zip and pocket. Now, I don't like side zips at the best of times. I understand that they're sometimes necessary and I don't tend to fault pattern makers for including them, it just always takes the wind out of my sails when I read the envelope of a pattern I really like and it says "side zip". This pattern requires a 7" invisible zip, which I found really hard to track down. I certainly couldn't find one in anything resembling a matching colour. At first I thought I could just use one of my 9" zips, but any longer than 7" and it gets in the way of sewing the side seam pocket. As it was I still found it quite annoying to get both the zip and the pocket sewn well in such close proximity. It has left me with a bit of weirdness on that side, which I think really impacts my feelings about the whole garment. If you have proportionally smaller hips than me, you can just leave the zip out and skip all this nonsense, but I wouldn't be able to get into the jumpsuit without a zip. 

(My machine has historically HATED shortening zips, so I don't even try anymore. I don't know what it is that makes it so upset, but it judders and glowers and swears at me by putting words in the stitch number display. We've agreed to just avoid it altogether.)


On the other hand, it is incredibly comfortable and I do like the look and the vibe. As I mentioned at the start, this is the wrong kind of summer for this kind of garment, and if things were less grey and muggy I'd probably feel a whole lot better about wearing this. I'm looking over these photos now and enjoying the way it looks, and I'm not sure if I was feeling self-critical and frustrated the last few times I put it on or if this is just one of those items that photographs a lot better than it looks in the mirror. If I'm feeling up to it I might try re-sewing the zip and clearing up the weirdness a bit, and that too might make me feel better about the whole thing.


On hotter days I often do hang out in the house wearing this. I think I've mentioned before that our living room is basically a greenhouse, so it's often a lot warmer outside than it is inside. This jumpsuit is the perfect thing for existing in my living room and not turning into a horrible roasting sweatbeast. I'm actually wearing it right now for exactly that reason, and having put it back on I do think that the weirdness around the pocket and the fact that I have to care what state my ankles are in are the main barriers to me wearing this jumpsuit. The first I can probably fix, the second I probably can't.


My final verdict is inconclusive. I'm pretty sure I won't be making this again - the shape just isn't what I want and I'm not really interested in working out how I can change that. I do hope that I can make my peace with this version and get some wear out of it, though; I really like the fabric and I do think this was the right kind of garment to use it for. If I could be inspired enough to fix the mistakes I think that would go a long way to changing my feelings. 

What's up next depends on what I can get photographed. The things I've made are anti-chafe shorts and an improvised bikini (my attempt went extremely wrong and I ended up making a pair of bottoms to match a sports bra toile I made and forgot to post earlier this year), neither of which really lend themselves to being photographed outside. We'll see what can be done! 


Closet Case Patterns Amy jumpsuit

Fabric: Printed viscose from Walthamstow
Cost: £9
Pattern details: Super wide leg, cropped jumpsuit with bust darts, lined bodice, side zip, and optional pockets and sash
Size: 16
Alterations: 2 inches of length added to the legs, belt loops added
Would make again/would recommend: Probably not/Unsure

Monday, 15 July 2019

summer sewing: Zadie jumpsuit

Hi! I've spent the last two weeks being completely owned by a gastric bug! YAY! That's okay, it's fine, it's not like I'm going on holiday on Friday and am now massively behind on sewing and organisation or anything. But I'm finally human enough to take photos, so here we go!

Last June we went to New York to visit some friends, and I insisted on fitting in a trip to Mood Fabrics. After many years of watching Project Runway it had acquired semi-legendary status in my mind, and almost all the American sewing people I follow talk about Mood pretty regularly. I was super excited to go, and super overwhelmed when I got there. It was about half the size I'd expected, but with about three times as much stuff. I'm really not sure how they managed to film in there. I spent about two hours in there, vacillating between "I must buy EVERYTHING and bankrupt myself" and "Can't do it, I'm just going to leave without anything" and stressing myself out. Patrick convinced me that I would regret leaving with nothing (I normally don't take him to fabric shops and when I do I'm pretty decisive, so he was not having fun at all, poor guy) and I decided to pick one thing that I had a plan for and would definitely be able to use.


This was not that plan.

I had bought this really beautiful soft raspberry linen with the intention of making a swing dress, and I put it on my summer plan last year. I made a toile... and hated it. I made a toile of a different swing dress and hated it so much that I never photographed it. Eventually I decided that I just wasn't going to be able to get the look I wanted from a swing dress, and gave up. I've had my eye open for other ideas since then, but nothing that might fit onto 2.5 yards of fabric presented itself.


When I saw that the Zadie jumpsuit only used 2.5 yards of fabric, I got very excited and could picture the resulting jumpsuit immediately, but after making my toile I was worried. The layout is incredibly fabric-efficient, leaving only a few scraps, and the actual pattern is for a cropped jumpsuit (I think cropped trousers look weird on me, so that length was never an option). I'd managed to squeeze a bit more length out of my toile, but that was 2.5 metres of fabric rather than yards. I put the jumpsuit off for a couple of months while I worried about what to do.


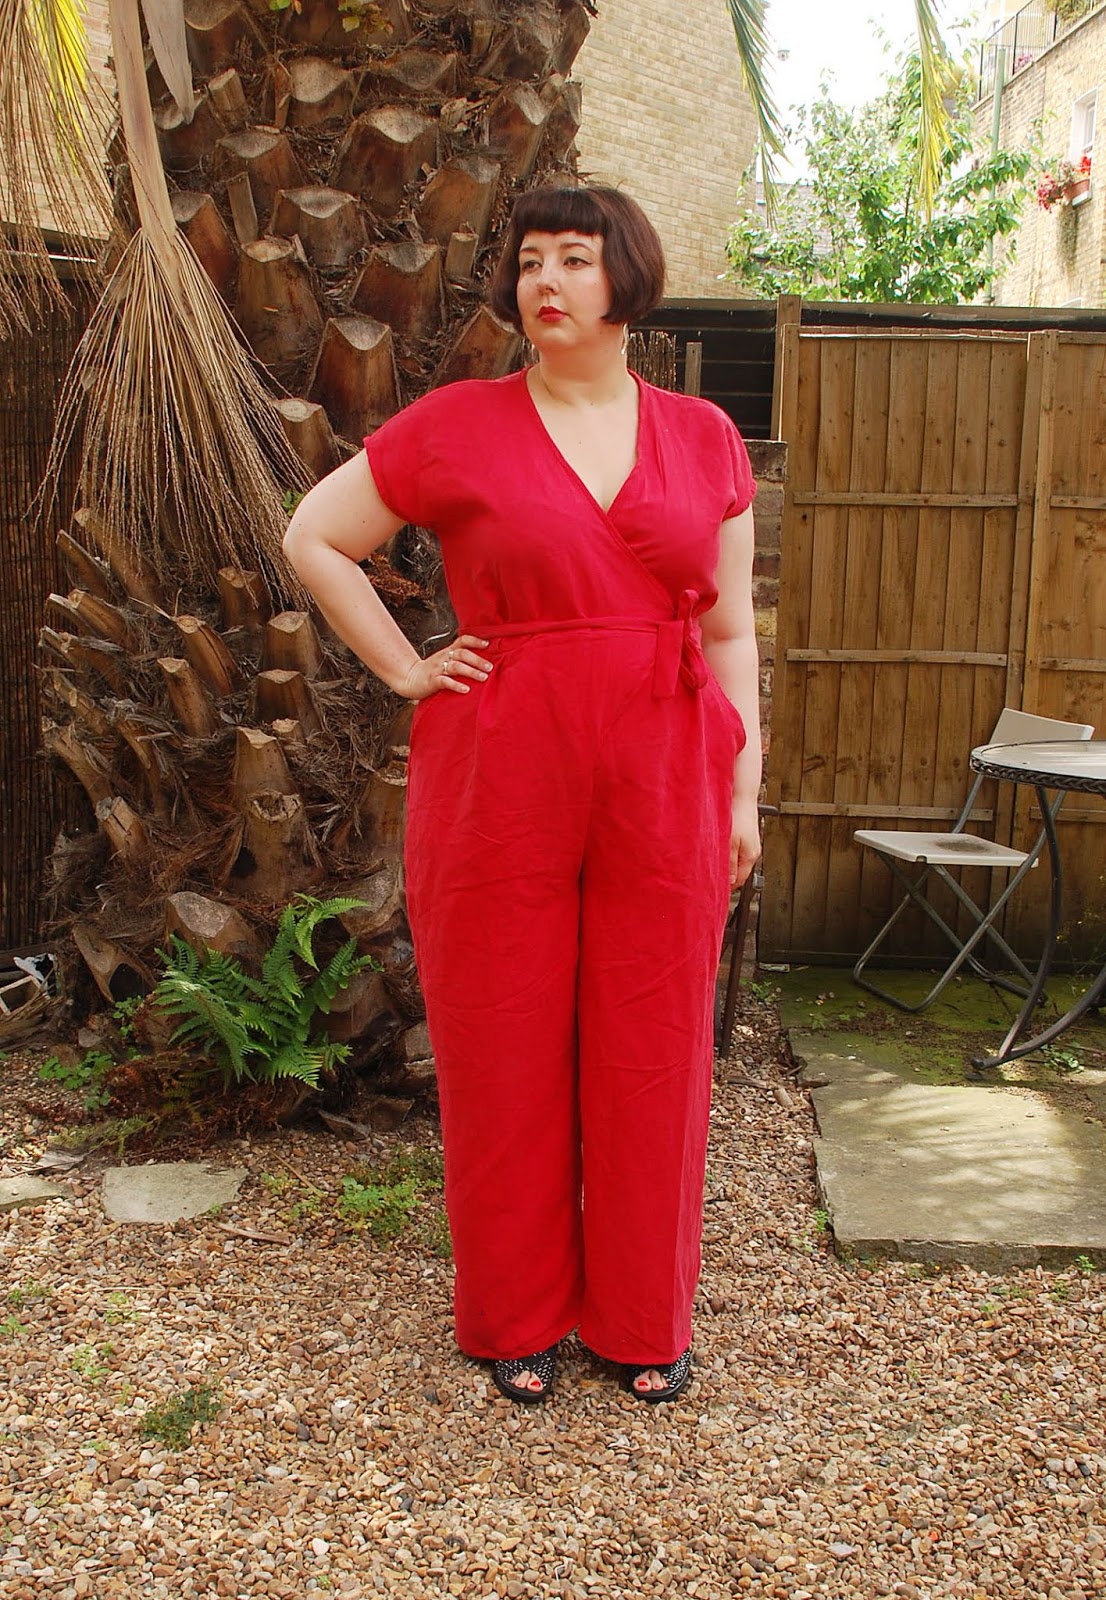
You will note that this is a full-length jumpsuit. What I only realised as I was halfway through laying it out was that this linen is SUPER wide. Wider than any fabric I'd ever used before, in fact. I cut out two Zadie jumpsuits in the same session and it was easier to get all the pieces out of this fabric than it was for the 3m cut I had of the other one. I'd cut bias binding from a different fabric just in case and it turned out I didn't need it at all. I could have made cuffs for the arms and legs with the scraps if I'd wanted to.


As last time, construction was super simple. I French-seamed the whole thing even though the thickness of this fabric makes it borderline awkward because I still don't have a functioning overlocker and historically I've found my zig-zag finished seams don't really like heat and sweat and rubbing very much. It was only the waist seam that gave me any trouble, so I think it was the right decision. I'd cut everything out a couple of weeks beforehand, and I got most of the actual sewing done in one afternoon.


I cut a straight 16 this time, and I'm very glad I sized down, because I think if it were too oversized I would look a bit like a supermarket warehouse worker (which I have been, though not in red, and I'm not too jazzed about revisiting it), but as it is I think it looks great. I really enjoy the casual vibe rendered in a glamorous colour, and as always when I make something red, I remember that I really need to find a way to work more red into my wardrobe. Red looks really good on me but head-to-toe red doesn't often fit my day-to-day general vibe and I've never been able to work out how to pair it with other colours in a way that I actually like. There are lots of shoe or accessory colours that I like with red, but in terms of finding a top or bottom to pair with a red item, nothing looks right on me. Black - nope. Navy - nope. Grey - only very specific tones. White - looks okay, but I'm not about to start making white clothes. Maybe I need to put some more effort into this.


I really like this jumpsuit and I think I'll wear it a lot this summer. My toile version is really nice but a bit... beach pyjamas-ish to wear in London unless it's super sunny, and we really aren't having that kind of summer. Because this one is linen it's nice and cool on muggy days, but it doesn't look instantly inappropriate when a cloud drifts in front of the sun. It's coming on holiday with me and I plan to eat a lot of oysters in it.

This is probably the last time I'll make this pattern until at least next summer. It's really great but I don't think I have room for more than three (the third is one I'm making for a blog post on Minerva). I know there's a long-sleeved version but I don't think that's for me.


I'll be on holiday next week and probably won't have caught up with my sewing enough to schedule a post in advance. Depending on how productive I am, the next post might be a bikini, a different jumpsuit, a bunch of anti-chafe shorts, or something else entirely. We shall see! 

Paper Theory Zadie jumpsuit

Fabric: Red linen from Mood Fabrics
Cost: I think about $40?
Pattern details: Wrap-front jumpsuit with cropped legs, big pockets and bias bound neckline made from self fabric
Size: 16
Alterations: Bodice shortened by 1 inch, 4 inches added to the legs
Would make again/would recommend: Yes/Yes

Monday, 1 July 2019

FULL GALAXY NIGHTMARE: Jalie Clara leggings

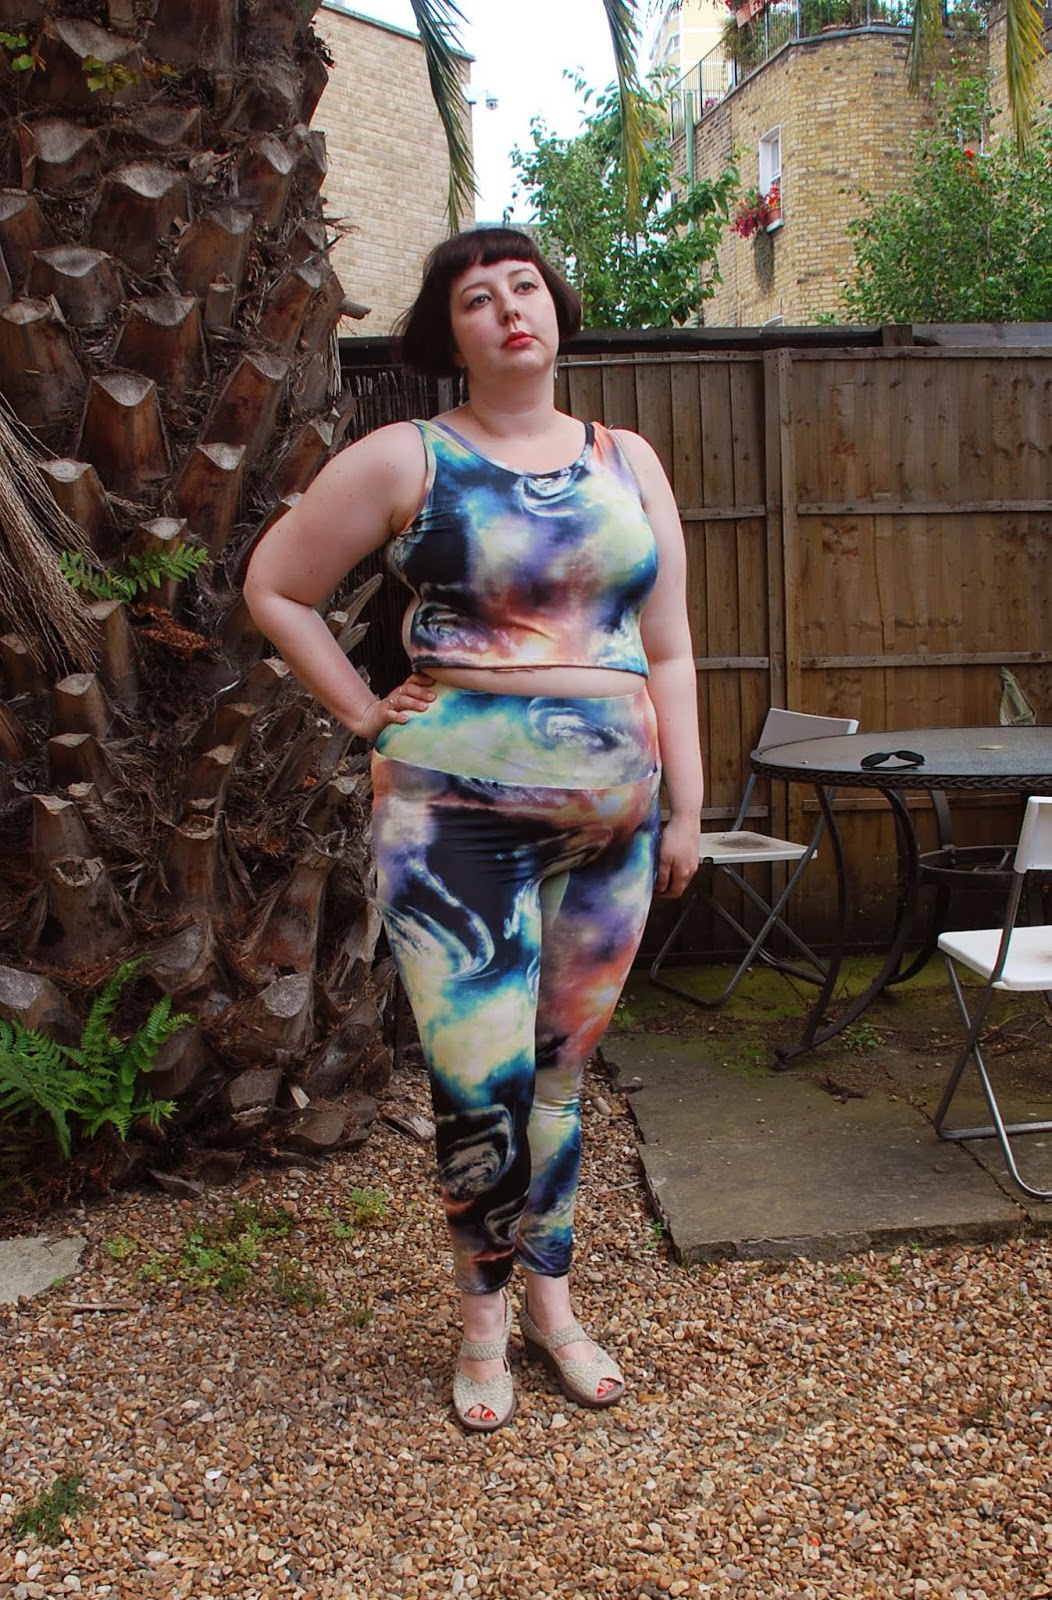
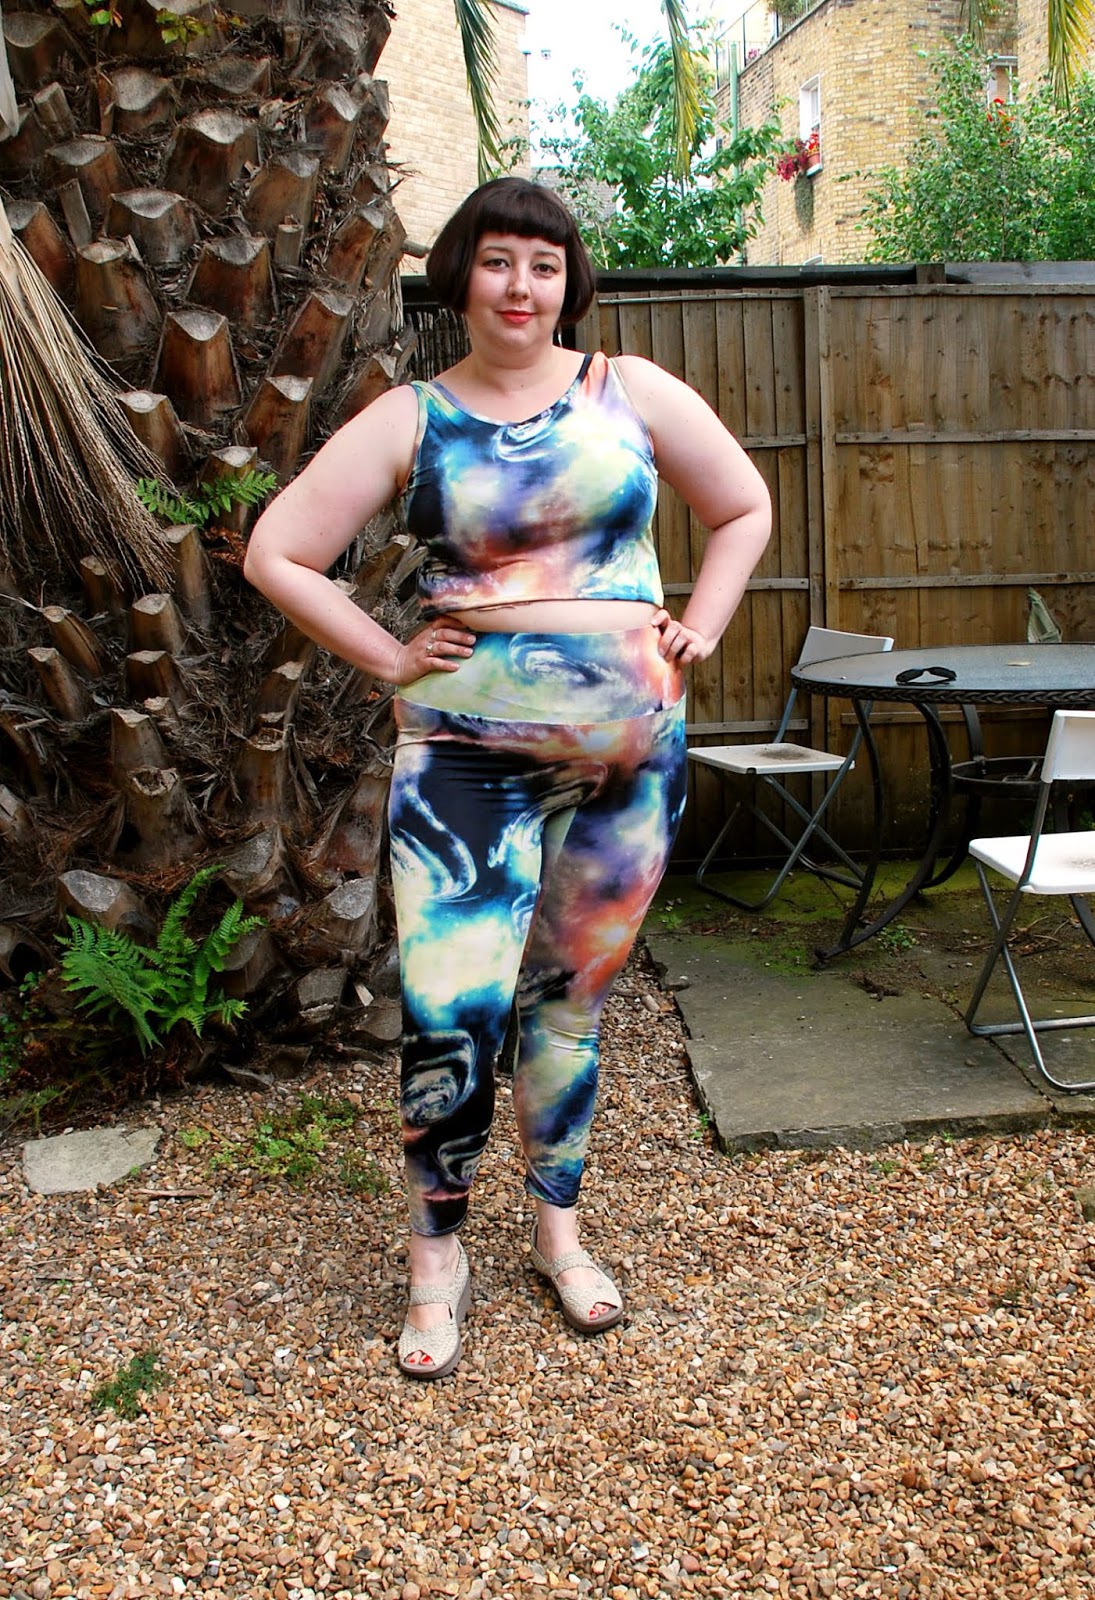
Behold the glory that is me in head to toe galaxy print:


I made my first ever pair of leggings in February, after many months of putting it off, and frankly the experience didn't encourage me. After a bunch of alterations I got them to photograph OK, but the videos I got from both the dance class and weightlifting session I wore them to told a very different story. Wrinkles. So many wrinkles. I've never worn oversized leggings before and I had no idea they looked that bad.

I knew that if my second attempt also failed I probably wouldn't be motivated to try a third time, so I went for the safest bet I could think of, which was Jalie. Well-regarded, specialists in activewear patterns, I've used and liked them before. I saw a few people of similar thigh girth to me recommend the Clara leggings, so that's what I went for. I made my test pair in the same grey fabric as my Simplicity leggings, but I wanted to start off with the ridiculous galaxy extravaganza, so the grey ones are further down the post.


I bought this fabric from Girl Charlee a couple of months ago as a way to try and motivate myself to make more leggings. I did not, at the time, have any intention of making a matching crop top - that was a bolt of what I'll charitably call inspiration when looking at the half-metre of fabric I had left over. It looked quite see-through when I got it but on the body it's fine. I think I would have preferred the print to have more of the dark colours and less of the confusing peach, though.


The leggings are cut as one piece, with no front or outer leg seam, with a wide waistband and a gusset for better fit. There's also a second view with no waistband and a lower rise. My first pair was slightly too low for me at the back, so I cut these an extra inch higher and they sit perfectly. I wish I'd lengthened the legs very slightly - on proper activewear fabric I think this length would be fine, but this stuff isn't as dense and so it springs up a bit higher on my ankles. It's not that big a deal, but it does look extremely dorky with my black ankle socks and weightlifting shoes. Which is why I'm wearing sandals with my workout gear in these photos like a weirdo.


The top is the Kommatia Patterns Coco tank top, which I got for $2 in a sale on Makerist. It's a fairly standard tank top pattern with nothing particularly noteworthy about it, but I didn't have a tank top pattern and you can't really argue with $2. It has both a regular view and a cropped view, and this is a slightly lengthened version of the latter. I also put in a cut-some-bumps-on-the-side FBA. It's a really nice fit and I'll definitely use it again. It's super-basic so I'm not going to recommend anyone rush out and pay full price for it, but I did also buy several more substantial patterns from them in the same sale and I'm excited to review those properly. 


Will I ever wear these out of the house together? I really don't know. True story: our back garden is at the exact same level as our neighbours' balcony doors, and those doors remained resolutely closed and curtained while I took photos of normal clothes. When I came back out dressed like this, the doors were flung wide open and three people were milling around, occasionally glancing at me in mild horror. Which is both quite funny and also not at all encouraging. I'm definitely not ready to go lifting in a crop top yet - fat does funny things when you're jumping and squatting. Both pieces will get worn at dance classes for sure, and maybe the full galaxy nightmare will emerge in public one day.

While we're here, this is the first pair of Claras I made:


(Please excuse the sudden hair change - this picture is a few weeks old.)

This is the remainder of the fabric I used for my Simplicity leggings. I was a bit short on length so I cut the waistband pieces wherever I could fit them instead of on the fold. I added two inches to the legs and as you can see, it was unnecessary in this fabric. When I first tried this pair on I found that the back rise was too low for me, so I unpicked the seam and put a small yoke in the back. I couldn't manage to take a photo where it was visible - these leggings are awesome but they photograph like shit. 

I tested them out by wearing them to a personal training session and they held up WAY better than the Simplicity ones in the same fabric. They fit like leggings are supposed to fit, which means it's much, much easier to do everything. Here's me doing a snatch (snatch, jerk, power snatch, muscle snatch, rack jerk, I love weightlifting):


I will be making a bunch more of these. I have another two pairs of full leggings cut out already, and also the shorts version for anti-chafe purposes. Leggings live and die by the fabric choice so much that it'll probably be a while before I completely replace my RTW workout gear (probably as long as it takes me to find decent black activewear fabric, honestly), but the pattern is completely solid and I can't imagine ever needing another one. You'll be seeing this again.  

Next up: jumpsuit! Power stance! 


Jalie Clara leggings

Fabric: Galaxy spandex from Girl Charlee UK
Cost: £26
Pattern details: Leggings in full, capri and short lengths with no centre front or outer leg seams, gusset for fit, and either high rise with wide waistband or mid-rise with no waistband
Size: AA in the waist blended out to CC in the thighs
Alterations: Back rise increased by an inch
Would make again/would recommend: Yes/Yes

Monday, 24 June 2019

summer sewing: emerald green Esther trousers

I made a pair of Esther trousers in April last year, and I thought I probably wouldn't make the pattern again. The shape is too distinctive to merit too many pairs, trying to get the pleats to lie flat was a huge faff, and try as I might I could not find a top to wear them with beyond the one in the blog photos. I tried a bunch of different lengths and shapes and colours and every time I looked like the doorbell had rung unexpectedly when I was chilling on the sofa in my underwear and had to scramble to put the closest things on. Pyjama realness. However, as spring progressed and I found myself severely lacking in trousers, I began to reconsider.


When I decided to make a second pair, I knew I wanted something slightly heavier in weight than last time and also a solid colour, to hopefully minimise the pyjama vibes I kept getting from my first pair. I had every intention of buying a neutral-ish colour for versatility, but it shouldn't have been any surprise to me that I came away with bright emerald green. Once again my camera refuses to accurately record any shade of green but it's much brighter than this in real life. The fabric is some form of crepe and has a little raised cross-hatch texture all over it. It's really nice.


Making these trousers in a heavier fabric was an entirely different experience. I will say that this crepe is probably too heavy; you'd be fine with a lighter crepe but this was definitely a tad too thick. Last time I said I wouldn't use a heavier fabric because of the bulk and volume of fabric around the thighs; I take that back. The reason not to use a heavier fabric is that sewing on the waistband is giant bulky pain in the arse. There are certain points on the waistline where you have the seam for the two front pieces, two large overlapping pleats, the pocket bag, and both sides of the waistband meeting in one place, and when you're trying to secure the waistband you're sewing through almost a dozen layers of fabric. I had every intention of French seaming it, too, which would have made everything worse.


On the plus side, I didn't have any of the same issues with the pleats here. I now think the fabric I used last time was too light, and it actually does need a bit of weight in order to naturally drape and fall nicely. You can see that this fabric is doing exactly what it's supposed to and there's nothing remotely prolapsed about it. Which is good, because it wasn't the easiest to press and it'll take a few more rounds with the iron before the seams lie exactly the way they should. I probably won't go back in for the pleats, though, I think they look fine.


Another thing to note that I don't think I mentioned last time is that the pockets are ENORMOUS. Almost my entire forearm can fit in there. I don't tend to carry a ton of stuff in my pockets but I really appreciate that they're there. Though I did once freak out on the Tube last week because I thought I'd lost my phone, having only reached in as far as I assumed a pocket would go instead of to the actual bottom of the pocket. Your stuff will be safe, is what I'm saying, and I don't think I really felt the benefit of them in the last pair because the fabric was so light and not really able to support the weight of much stuff.


The pattern comes with an optional sash, which I decided I did want to make this time. I prefer the look of these with the sash but want the option to wear them without, which leads to a small drawback: the sash doesn't attach to the trousers in any way, and the style of both really doesn't lend itself to belt loops. It's not a huge deal, and wearing the sash loosely double-knotted like this seems to keep it from falling off, but it does add a layer of minor annoyance to going to the loo. Especially in public. I have now found myself awkwardly wearing the sash around my neck in pub toilets multiple times.


Please excuse my face here, it turns out I only took one solitary no-sash picture. I'm not sure why that was. 

Despite the bright green, these will definitely be much more versatile and wearable than my first pair. I've tried them on with a few different things and they do not look like pyjamas with any of them. It does have to be said that the emerald green limits my colour pairings somewhat, so I'm thinking of making a couple of tops to go with them and also be useful elsewhere; depending on availability of appropriate fabric I'm planning for grey, blush and possibly some shade of blue or yellow if I can find the right one. I LOVE yellow and green but I'm not sure I love yellow tops with green trousers, so we'll see.


 (The weather is ridiculous and all over the place and unsummer-like at the moment, so the white balance of these photos is all over the place and I was occasionally forced to turn into a cat when the sun came out. I decided not to include all the grumpy windswept ones.)

Overall I'm much more positive about this pattern than I was last time, and I think I probably would make another pair if I could find the right weight and colour of fabric. I've got a much better understanding of what works and what I'd be looking for now, so finding the colour would probably be a much bigger pain than finding the weight. I don't want bright and I don't want true neutral, which basically takes it right out of my wheelhouse. What colour would you make these trousers in?


Next up: leggings! It's head-to-toe galaxy time!

Victory Patterns Esther trousers

Fabric: Emerald green textured crepe from Walthamstow
Cost: £9
Pattern details: Pleat-front trousers in two lengths, with waistband, back zip and button, and optional sash
Size: 16
Alterations: None to the pattern itself; substituted back button for press stud
Would make again/would recommend: Yes/Yes

Tuesday, 18 June 2019

swanky loungewear: a second Asaka robe

When I was struggling to start sewing again last month, I put my plans to one side to make a few simple, fun things. This was one of them:


I've been trying to put together a coherent loungewear wardrobe for a while, and you can consider this the first instalment of a vague series. I think it's something you either care about or you don't - a lot of people have no idea why you'd bother spending time and money on something you'll never wear outside, and I entirely understand that. I just enjoy being unnecessarily fancy at all times. On my list is a few different pyjama sets, a couple of outfits that are mostly pyjamas but I could also wear to take the bins out (we have a super weird rubbish collection set up so taking the bins out requires walking much further away from our flat than I would be prepared to do in pyjamas. Basically my rule is that if I have to cross a road I need to have something resembling actual clothes on), and a summer robe. Which is what this is. 


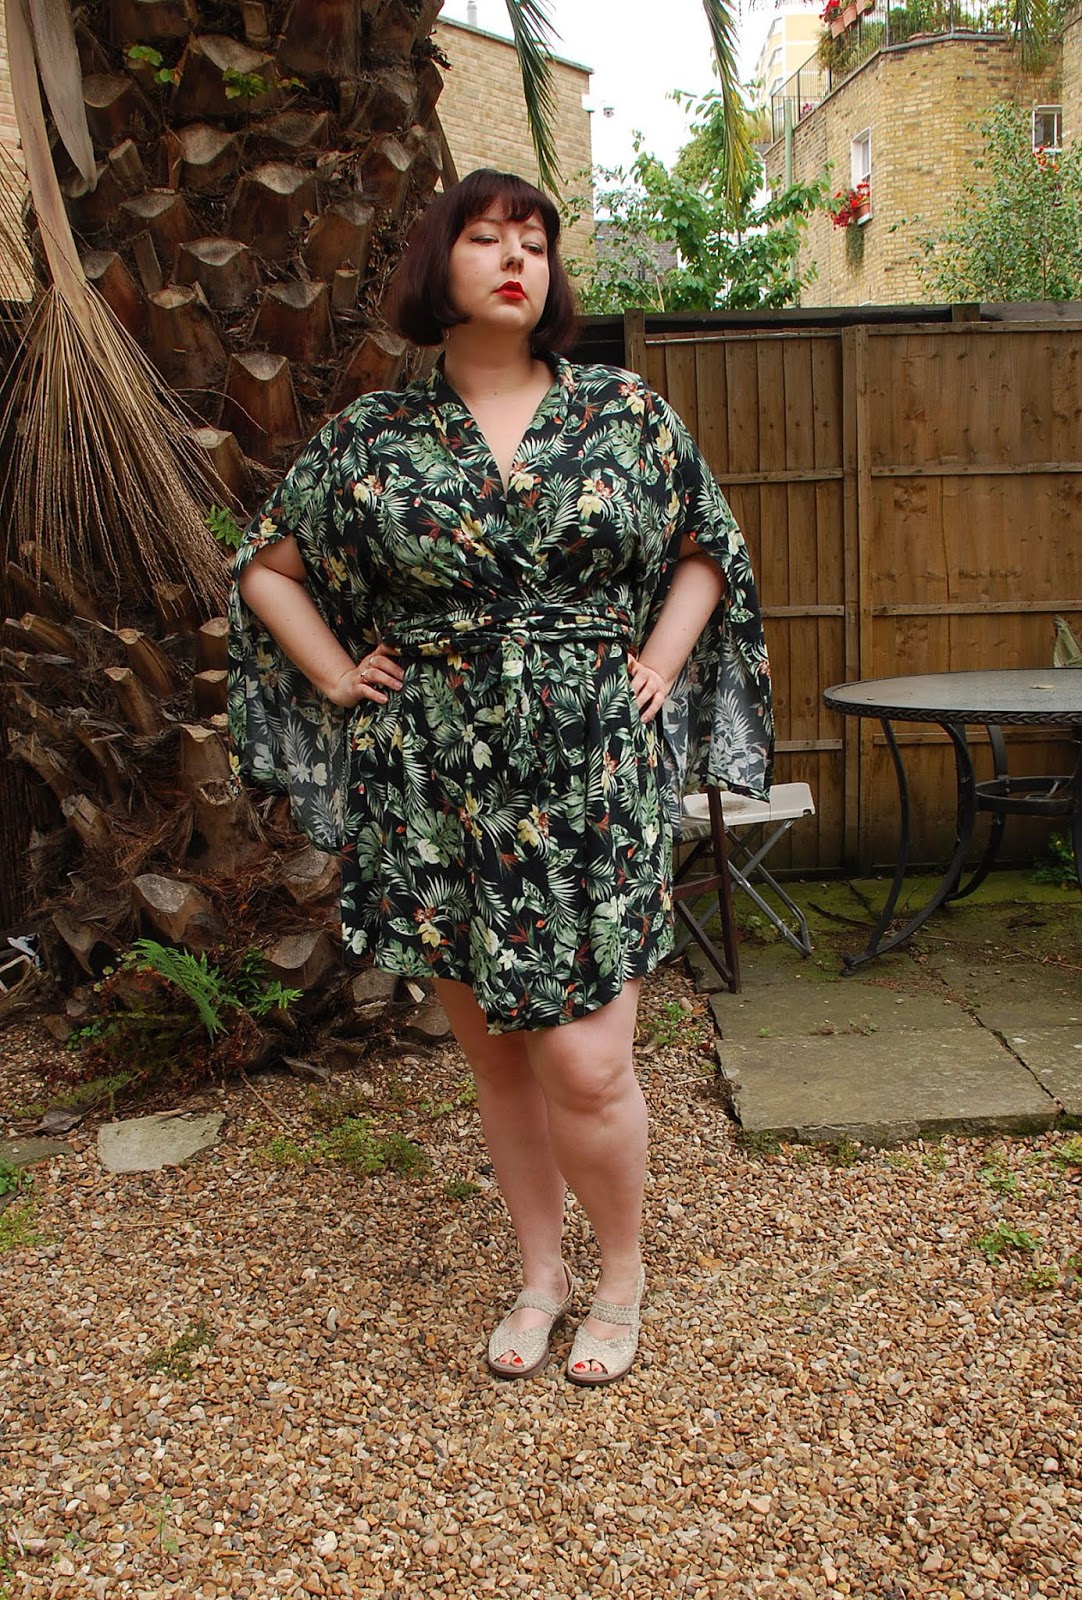
I made an Asaka once before (when the pattern was still called a "kimono") and though I love it, the fabric isn't as breathable as I would like. It's fine for the autumn, but on hot days I just die in it instantly. When I decided to make a second one I went out looking for pretty much this exact fabric - black background, leaf print viscose - and found it in one of the shops at Walthamstow. I bought four and a half metres, and sort of expected to have more fabric left over than I did. Based on how much fabric I used last time I was planning a cami and shorts set to go under it and possibly a slip dress as well, but looking at my offcuts it'll be a pair of shorts at most. 


Last time I lengthened the robe substantially, this time I didn't. I was initially planning to bring it to knee-length, but in the end I wasn't a fan of the way that looked. I did scoop it down a bit lower at the back to keep some kind of barrier between my bare legs and our leather sofa. I also lengthened the belt so that it wraps as many times as I want it to. 


Construction was exactly the same as last time - I French seamed the whole thing so it's lovely and clean on the insides. It's an incredibly easy project once you get the whole "French seam into two hems" thing on the sleeves figured out, and this fabric is MUCH easier to press than the last lot. However, the interfacing I used was way worse. I ordered interfacing from some site once upon a time and ended up with twice as much as I bought (the original order went missing, they replaced it, and then six months later the first one showed up, slightly scarred from its many travels), and it's horrific. It's such a loose weave that the glue always ends up stuck to the iron, meaning there's barely any left to adhere to the actual fabric. GAH. I'm trying to use it up in places where it won't matter as much and I will be so glad when it's all gone. 


In terms of appearance, my first Asaka looks better than this one. The length, the weight of the fabric, and the style and saturation of the print were all perfect, whereas this one is more of a "does the job" sort of thing. But that's OK. What I need for the next few months is a shorter, more breathable robe that will let me exist fairly comfortably in our stupid greenhouse of a living room, and this will absolutely do that. I will also get round to a pair of matching shorts and a black jersey T-shirt or vest top within the next month; it's just occurred to me as I'm writing this that a decent chunk of our holiday is going to be spent in a shared AirBnB with Patrick's family and thus I am actually going to need some warm weather sleepwear pretty sharpish.

I wouldn't rule out making a third one of these, but it would definitely only be a "this fabric DEMANDS it" sort of thing and I won't be actively seeking it out. Three exaggerated-sleeve dressing gowns is a tad excessive when you live in a one-bedroom flat, unless maybe I made one for Patrick in place of the velvet smoking jacket we agreed on ages ago but have been unable to find a decent pattern for. Fair substitute? 


I'm delaying the leggings post until I make the matching top and can go full galaxy nightmare on you, so next up will be my bright green Esther trousers. I had a completely different experience with the pattern this time and ended up with a very different-looking pair of trousers, so I'm quite looking forward to sharing!


Asaka robe dress

Fabric: Printed viscose from Walthamstow
Cost: £8
Pattern details: Wrap robe/dress (or, indeed, robe dress) with wide vented two-piece sleeves, flat collar and long tie belt
Size: UK18
Alterations: Back lengthened by 3in, tie belt extended
Would make again/would recommend: Yes/Yes

Monday, 10 June 2019

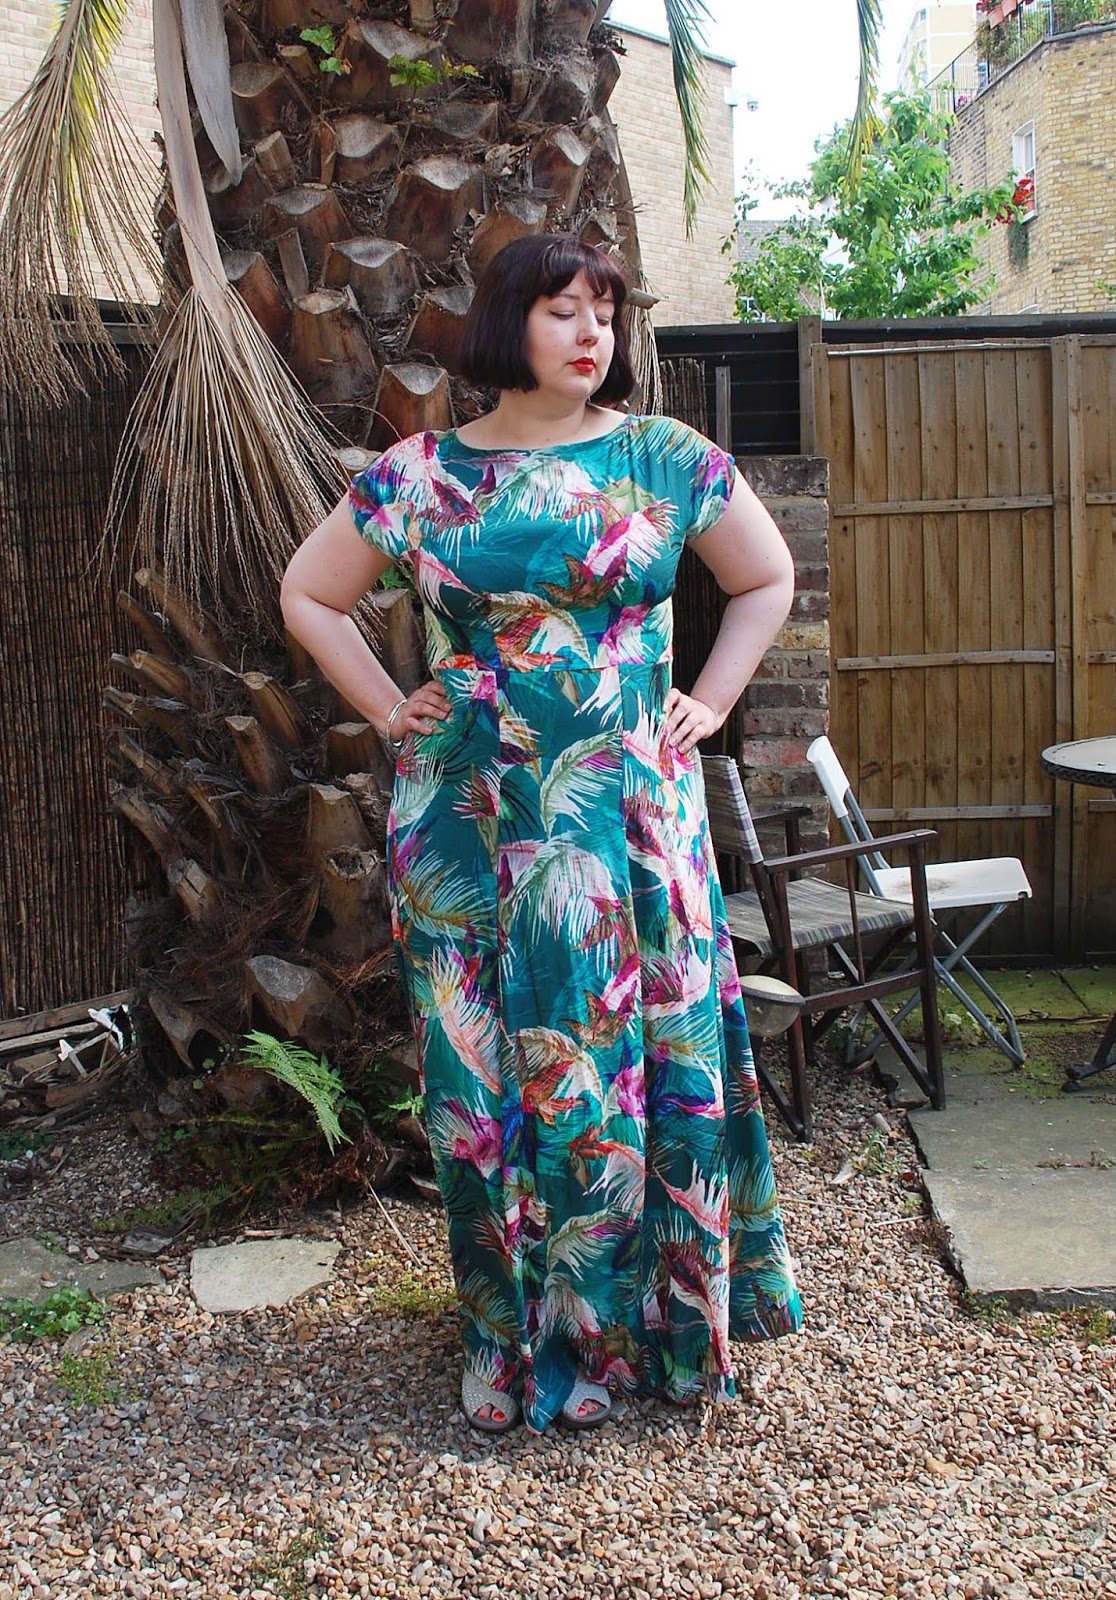
summer sewing: a jade green maxi dress

I got it done on time!


I haven't made a BHL Anna dress since late 2017, when I made several of them in quick succession the decided that I'd reached saturation point and really needed to find a new go-to woven bodice. What happened instead, as you may have noticed, is that I've barely made a woven dress since. It just feels like too much work. I've made a few attempts in the past to fit a princess seam bodice properly and it's REALLY annoying. Trying to get the neckline to lie properly, the waist to hit where the waist is supposed to hit, and most awkward of all the fabric to sit in properly under the bust instead of creating a weird slope from the apex to the waist was super frustrating and I just gave up. Maybe I'll try again soon.

With the Anna, however, you just make a couple of pleats and you're good to go.


When I bought this fabric - viscose crepe, beautiful texture, swishy rather than floaty if you want to get technical - I'd intended on trying a new strappy maxi dress pattern with it. I saw a pattern in Sew Today that looked like just the thing, but they didn't provide a photo of the back and when I went to buy it, I discovered it wasn't remotely bra-friendly. I had a look for something else I liked, came up short. Everything was either not suitable for wearing with a bra or was button-front, which I just don't like. I was going to hold on to the fabric to see what else would be released in the summer before I realised I had to attend a wedding on the 7th and didn't have anything to wear. I'd known about the wedding for a while but hadn't got clarity on the dress code (i.e. whether visible lower leg was acceptable for the temple or not), and by the time I realised the bride was going to be way too rushed off her feet and stressed to answer my nitpicky questions I barely had a week left to make the dress.


I played it safe and made the full-length version, and I'm glad I did. I'm still not exactly sure what the temple rules are; there was a woman there in a shorter dress and they didn't kick her out or anything, but everybody else was covered to the ankles, so I felt much more comfortable in a maxi (even though it was raining all day and I had to be on full puddle avoidance alert). I omitted the front slit for obvious reasons. At first I thought I might unpick it later to put the slit in after the wedding, but after wearing it for both days of the wedding I think I'll keep it like this. It's slightly less fancy-glam with no slit, and while I'm a big fan of fancy-glam it's not always the most versatile thing.


This is a size bigger than I usually make because stress-eating has consequences. I'm trying to work on that now (in conjunction with my therapist, no diets, slow progress, all the good stuff) but in the meantime I do need a little bit more room. The fabric also has a very slight stretch to it, meaning that the dress is super mega comfortable and I would be quite happy to wear it for eating giant meals. In fact, that's likely to be its main use over the summer. Other than that it's my standard altered Anna with a 2.5in FBA and no neckline facing. I have never used the included facing on any of my Annas after hating it so much on my original trial bodice, but I use a different alternative finishing method almost every time. For this one I used bias binding and topstitched it down to the inside.


Here's a photo we took outside the wedding venue. I wore a pashmina to cover my upper arms (I didn't make it, I bought it in Spain at least fifteen years ago) and I borrowed a pink and green headscarf when we got inside. The two-scarves thing was a bit unwieldy and I would have been better off with a shrug or jacket or similar, but I don't have anything that a) is formal enough, b) can be reasonably worn indoors, and c) doesn't look like ass with a full-length dress. I definitely didn't have enough time to conceive, buy supplies for and make such a garment, so unwieldy double-scarf action it was. For the reception the following evening I just stuck one of my Lupin jackets over the top to get me to the venue then wore it as is. Much curry was eaten. Many open bar cocktails were had. Much dancing was done to Uptown Funk, which seems to have finally dethroned Billie Jean as the opening wedding disco song of choice, and joyous techno-bhangra. Despite the dress being full length and me being drunk, I had zero issue dancing in it. Bonus!


I'm very pleased with this and I think it'll work just as well for standard summer days as for fancier occasions. I really like it with my denim Lupin. I'm particularly looking forward to wearing it during our holiday to San Sebastian next month, where we will just be eating constantly, as far as I can tell (it's my father-in-law's birthday and he's been planning this trip for at least a decade) and it's always good to look fancy as you fill your face with seafood. I won't make another Anna for a while but it's really nice to revisit an old favourite every now and then. 

Next up: either leggings or summer robe, depending on how photography goes this week!

 By Hand London Anna dress

Fabric: Viscose crepe from Walthamstow
Cost: £9
Pattern details: (as if you need these) Kimono sleeve dress with boat or V neck variations, underbust pleats, seven-panel skirt with maxi or knee-length variations
Size: UK 18
Alterations: 2.5 inch FBA, facing swapped out for bias facing
Would make again/would recommend: Yes/Yes